Running a DNS-over-HTTPS endpoint on FreebSD (DoH)
Wednesday, July 10th, 2019The buzz about DNS-over-HTTPS (DoH) has been going on for a while, but a recent controversy in the UK sparked renewed interest in this proposed standard in me.
The idea is simple: instead of sending out plain text DNS requests to your ISP (who may log them and share them with shady agencies), tunnel all DNS requests over an encrypted HTTPS connection to a trusted server. With emphasis on trusted (I’ll get back to that).
Mozilla Firefox, the browser that promotes technology that protects your online privacy, has announced that they intend to make DoH standard. However, by default Firefox will funnel all your DNS requests to CloudFlare. They claim to have a special agreement with CloudFlare, and CloudFlare will not log your queries (or well, something along those lines anyway, the exact wording may be a bit less, uhm, concise).
This may seem counter-intuitive: from having my DNS queries logged by my local ISP, which is bound by the local EU privacy regulations Firefox wants to ship all my queries to some big North American company that is not bound by our laws. Worse yet, it is bound by American law to spy on us.
So it seems DoH is a net loss. But let’s not throw out the child with the bath-water: the technology behind DoH has some merit. But it requires the DNS queries to be forwarded to a trusted DoH server, which CloudFlare clearly isn’t.
So, I decided to try and set up my own DNS-over-HTTPS server to use in Firefox on my laptops and mobile devices.
Setting the stage: tools
This is a relatively new and volatile standard. In fact, it is not yet ratified but exists as a proposed standard as RFC 8484. This means things may change before becoming a real standard. Things indeed have changed in the past, and this is apparent when trying out the available tooling. Much of it is incompatible with existing public DoH servers or DoH client implementations such as implemented in Firefox.
This makes debugging a bit hard, which can be annoying when you are trying to set up a server yourself while trying to get to grips with the technical details. You often wonder whether you are doing something wrong or whether the tool is broken.
After trying a plethora of obscure and not-quite-functional software, I ended up with Facebook’s (of all people…) set of DoH tools. It’s billed as experimental, but readily available from Python’s package index (pip). I only used 2 of the 4 command-line tools:
- doh-httpproxy – accepts dns-over-http and forwards the queries to a regular resolver;
- doh-client – a useful tool to perform DoH queries from the command line, useful for testing.
Overview
The diagram below shows the interaction between the various components:
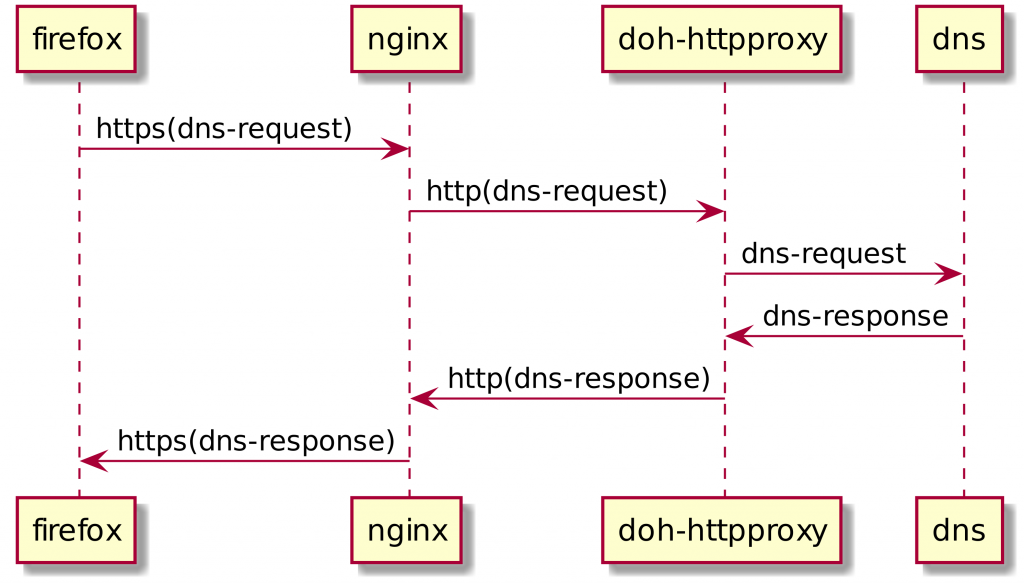
Firefox, when configured to use my DoH server, will send an https request to nginx, which is configured as a reverse proxy. This is so that I don’t have to expose Facebook’s experimental code directly to the outside world. SSL termination also happens by nginx.
The request is then sent to the doh-httpproxy program over plain http (which is ok, since both are on the same host). The query is then forwarded to an existing dns resolver using the regular DNS protocol. I use the resolver of my hosting provider, but of course you could also set up your own recursive resolver and use that instead.
Installation
Disclaimer: this section contains a lot of commands – don’t blindly copy-and-paste, but make sure that you understand what each command does before executing it and that you are ok with the effects of the commands.
So let’s get started. To run my DoH server, I have set up a dedicated FreeBSD jail, so I won’t bother with a virtual env as I normally do when installing Python software on servers. I just install things system-wide inside the jail:
pkg install python36 py36-pip py36-supervisor nginx bash
pip install doh-proxy
That will install python, supervisord (we will need that later to automatically start doh-proxy at boot-time) and nginx.
Nginx
Now let’s set up nginx as a reverse proxy, with an initial self-signed certificate. Start by editing /usr/local/etc/nginx/nginx.conf, and add some lines at the end:
...
    server {
        listen       80;
        server_name  localhost;

        ...

        location /.well-known/acme-challenge {
            root /usr/local/www/acme-challenge;
        }
    }

    include vhost.conf;
 }
Now create /usr/local/etc/nginx/vhost.conf:
    # HTTPS server
    #
    server {
        listen       443 ssl http2;
        server_name  doh.example.com; # replace with your own domain
        server_tokens off;
        ssl_certificate      ssl/doh.crt;
        ssl_certificate_key  ssl/doh.key;
        ssl_session_cache    shared:SSL:1m;
        ssl_session_timeout  5m;
        ssl_ciphers  HIGH:!aNULL:!MD5;
        ssl_prefer_server_ciphers  on;

        location /secret {
             proxy_pass http://127.0.0.1:3000;
        }
        location / {
             root   /usr/local/www/doh;
             index  index.html index.htm;
        }
    }
Now, let’s create some directories and generate an initial self-signed SSL certificate (will be replaced later by acme.sh):
mkdir -p /usr/local/www/acme-challenge
mkdir -p /usr/local/www/doh
mkdir -p /usr/local/etc/nginx/ssl
cd /usr/local/etc/nginx/ssl
openssl req -newkey rsa:4096 -nodes \
          -keyout doh.key -x509 -days 365 \
          -out doh.crt
Now we can start nginx:
sysrc nginx_enable="YES"
service nginx start
Letsencrypt
Time to replace the initial self-signed certificate with a letsencrypt certificate provisioned through acme.sh:
curl https://get.acme.sh | sh
bash
acme.sh --issue -d doh.example.com -w /usr/local/www/acme-challenge
acme.sh --install-cert -d doh.example.com \
        --key-file /usr/local/etc/nginx/ssl/doh.key \
        --fullchain-file /usr/local/etc/nginx/ssl/doh.crt \
        --reloadcmd "/usr/local/etc/rc.d/nginx reload"
Supervisord
And finally, create the configuration for supervisord to start doh-httpproxy in /usr/local/etc/supervisord.conf:
[unix_http_server]
file=/var/run/supervisor/supervisor.sock

[supervisord]
logfile=/var/log/supervisord.log
logfile_maxbytes=50MB
logfile_backups=10
loglevel=info
pidfile=/var/run/supervisor/supervisord.pid
nodaemon=false
minfds=1024
minprocs=200

[rpcinterface:supervisor]
supervisor.rpcinterface_factory = supervisor.rpcinterface:make_main_rpcinterface

[supervisorctl]
serverurl=unix:///var/run/supervisor/supervisor.sock
history_file=~/.sc_history

[program:doh-httpproxy]
directory=/usr/home/doh
; replace 1.1.1.1 with your preferred upstream resolver
command=/usr/local/bin/doh-httpproxy --upstream-resolver=1.1.1.1 --port 3000 --listen-address 127.0.0.1 --uri /dns-query --trusted
stdout_logfile=/var/log/doh-httpproxy.log
redirect_stderr=true
startsecs=10
stopsignal=QUIT
autostart=true
autorestart=true
user=doh
Note that the –uri argument to doh-httpproxy is redundant, since the default is already /dns-query. I included it to show how you can change the uri if you desire so (see Conclusions below for why that might be a good idea).
Create the doh user and start supervisord:
echo "doh::::::::/bin/csh:" | adduser -f - -w no
sysrc supervisord_enable="YES"
service supervisord start
Command-line DoH queries
And that should have you up and running! To see whether it works, you can run doh-client. For example:
doh-client --domain ns1.sonologic.net --uri /dns-query --qname example.com --qtype a
This should show you the IPv4 address(es) of example.com. If things are failing, you can check some of the log files for trouble:
tail -f /var/log/nginx/error.log
tail -f /var/log/nginx/access.log
supervisorctl tail -f doh-httpproxy
Configuring Firefox
Of course, for this to be actually useful, you need to configure Firefox to use your fresh DoH server. This is described in an article on zdnet. In summary:
- click the hamburger menu (the three lines in the top-right of the Firefox browser);
- Choose ‘Preferences’;
- Type ‘doh’ in the ‘Find in preferences’ searchbox, hit enter;
- This will show you ‘Network settings’, click the ‘Settings’ button;
- Scroll down in the dialog, and check ‘Enable DNS over HTTPS’;
- Check the ‘Custom’ sub-option, and enter your DoH server uri (ie. https://doh.example.com/dns-query).
That’s it. For advanced usage (or on Firefox on Android), you can type ‘about:config’ in your address bar, then search for ‘trr’.
You can configure your DoH uri as ‘network.trr.custom_uri’ and ‘network.trr.uri’ (I guess only custom_uri should be enough, but better safe than sorry and change them both).
Especially take note of ‘network.trr.mode’, this should be a number between 0 and 5 (inclusive), meaning:
- 0, DoH disabled
- 1, DoH enabled, but if regular dns queries are faster don’t use DoH
- 2, DoH enabled, use regular dns queries as a backup if the DoH server is broken
- 3, DoH enabled, regular dns disabled
- 5, DoH disabled
So for maximum security, use setting 3. This prevents any regular DNS queries from going out (and will show you an error when the DoH server is down).
This presents an apparent problem though: in order to do DoH, Firefox will need to resolve the domain name of your DoH server. With DNS disabled, this is not possible. To help you out, you can manually enter the IP address of the DoH server in option ‘network.trr.bootstrapAddress’.
Conclusion
Setting up a DoH server is relatively easy, and it does give one that warm fuzzy feeling knowing that your DNS queries are now encrypted and handled by a server under my control instead of whatever infrastructure I happen to be using on the road.
It seems DoH is just a tad bit slower than using my home ISP’s DNS servers, even though DoH is motivated by the claim that DNS servers are often slow. Maybe that is the case in North America, where internet speeds have historically been abysmal overall compared to Europe, but I haven’t found this to be the case in places where I regularly use the internet. I haven’t done any precise measurements though, so consider this to be anecdotal evidence at best.
What’s lacking though, in my humble opinion, is some form of authentication. My DoH server is exposed to the world. Sure, you will need to know the host to be able to use it, but /dns-query seems to be the default for most public DoH servers so it is easy for anyone to scan the internet for open DoH servers. I have chosen a different url path instead of the default /dns-query. It is a bit in the ‘security by obscurity’ league, but at least it prevents any random person from (ab)using my DoH server without having to guess the url path.
Finally, I still am not convinced DoH has a net positive outcome. Not many people will run their own DoH server, so CloudFlare will be able to analyze the DNS traffic of 99.9999% of the Firefox users. This is, in terms of online privacy, quite a step back.
![]()